Wednesday, November 26, 2014

Shop'in With Mom

...I almost couldn't keep up...


    My parents are here for their usual Thanksgiving visit. When they are here things get really busy around my house. Most of it is because of my mom. She loves the Asian markets that only take about a half hour to get to over here. Up in Washington state, it takes them two and a half hours to get to their favorite market.    Yesterday we got out early and made our way over to 99 Ranch. It was also a bonus for me, because my son drove! Most times I'm driving, so I don't get to look around. 


The produce always looks so tempting. You can get your usual goods, but mixed in are some more exotic items. I wish I could show you more of the most interesting things, but taking pictures in such places is considered bad luck. (I had to snap quickly!)


So many Aloe drinks! I do enjoy an Aloe drink once in a while. They come in a myriad of flavors. Tea, Lychee, Strawberry, Guava...my favorite is coconut. :)

Besides all of the grocery items, there are pretty things for your home....


I Have to hold back buying dishes. I love them all, but I've got no more space! 


I used to grow Orchids so easily back home in Hawaii...however, I don't seem to have any luck growing them here in California. Such a bummer, because aren't they gorgeous?!

My mom was elated because she was the first in line to get the fresh roast pork. I swear I heard a choir singing in the background when they brought the roast out from the kitchen. (They do a whole pig everyday.)  My mom did a little hop and silently clapped her hands! LOL! It cracks me up to think about it! Although my mom visits once or twice a year, the butcher remembers her and gives her a break on her final order. He also asks her specifically what parts she wants. ...In fact, she always seems to have good luck with getting the deals. My mom also did some ordering at their Dim Sum bar. She had ten orders, but the lady said I'll charge you for eight. Anyhoot, it was nice to see my mom so excited about her purchases....and cute to see my mom handing my dad some goodies when we got home, saying that she got some of his favorites. :) 


Tuesday, November 18, 2014

Punch Bow

...supplies do'in double duty...


   Some time ago I bought the  "We R Memory Keeper's Envelope Punch Board." Since I make mail art every month, I thought that I would be using it a lot. However, it's not the case. It's not because it doesn't work well. It works just fine. I guess I'm just stuck in my own habit of how I usually make envelopes. I do use the corner rounder that is built in quite a bit, but I'm determined to get more use out of this punch board. I have a mental bucket list in my head of things to try out. One of them is to make bows with it. I can check off one item from my list. :)


Above is the punch board that I am speaking of. Some peeps have The Stamp'in Up version. They are the same thing, just packaged differently. 

Besides the punch board, you really don't need much to make these adorable bows. In fact, it's a good way to use up scraps of paper


You will need a strip of paper that is 1 inch by 6 inches. Another strip that is 1 inch by 3 1/2 inches. A tiny scrap that is approximately a 1/4 inch in width and an inch long. That last strip doesn't need to be too accurate. I've even changed it up a bit. Other than that, you will need glue or glue dots and a bone folder.

I could type out the instructions, but here's a video that I watched, to learn how it's done. The video is by Brianna Thompson via YouTube

Check out her video and make a bunch of fun little bows....They are so addicting! Imagine using Gelli printed pages. :)


Sunday, November 16, 2014

Oddball Ornaments

...it's another weird swap...


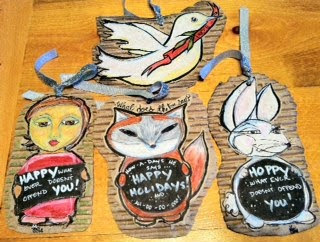
    I seem to be gravitating toward weird swaps! The latest swap I'm in, is by another arty friend of mine that goes by the user name Nanner. (I lovingly refer to her as my Nanny...although, I think I'm older!) Anyhoot, the swap is for holiday ornaments and the twist is that they need to be a little off , or oddball. I've finally gotten my four ornaments completed. I used cardboard as my base....and yes, they started with a simple sketch....


The twist that I am going for is being politically correct. I found the quote above on Pinterest and thought, well this is probably on a lot of people's mind this time of year. Personally though, I'm not offended if someone wishes me a Merry Christmas, a Happy Hanukkah, or a Happy Kwanzaa. All they are really wishing you is happiness. Who could be cross with that? Not me....:) 


Here's my fox...he keeps it correct by saying Happy holidays. ...so how did I make these? I cut out a piece of cardboard. Did a simple sketch with a Sharpie. Colored the characters in with water soluble wax pastels. For the broad black lining I used a Pentel Color Brush. The area with the quote was done with two white pens, Uniball Signo Broad and Recollections. To finish it off, I did my usually thang. I added some stippled sparkles from my Gelly Roll Stardust pen.


My twist here was to say, "Duces," instead of "Peace". I'll explain...(just because, I didn't know what that meant until recently...) Duces is what the kids say now-a-days to say good bye. It comes from forming your fingers in the peace symbol....two fingers up, hence the duces for two. I thought that I was being clever adding duces "peace" to my Dove....but then I saw it all over Pinterest while looking for a Dove to sketch!


To finish these guys up, I took an Exacto knife and cut around the characters. I then carefully tore away the  top layer of paper, exposing the corrugated middle. I love the texture! If you try this, just remember to tear away from your drawing. Ya don't wanna have a rip go across your work.  "Duces!"

Saturday, November 8, 2014

Far Out Mail Art....

...way out!


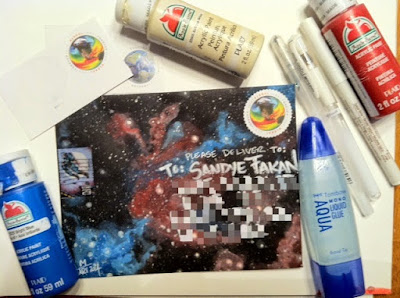
    Completed my 2nd partner's Envie for November. The rules are that the subject matter is always artist choice and although I could blissfully go on with sketching more fruit, I do try to create something from their wish list. Sandy's wish list included the Old West  and Space/N.A.S.A. themes. First I thought, I've gotta do something Western. I'm not good at scenes, so I thought perhaps a horse....maybe a Sheriff's star? Nah, couldn't seem to get that on paper. Then I started to think about stars and astronauts....but I was thinking there's just no way I could pull that off either! 

   After a bit of uncomfortable squirming and fidgeting, I suddenly remembered something that I saw on YouTube. The video is from Sea Lemon on how to make a galaxy print. Instead of me blah blahing about how it's done, view her video. She explains it very easily. ...and from experience, let me just say, you're gonna feel like you're painting crap at first! LOL! Just stick with it. Tweak it here and there...it'll start to take shape. When you're done viewing the vid, meet me back here.


So, this is what I ended up with. Just like she suggested, I used a dark background. In my case it was black cardstock. I didn't have the oil paints that she used, so I used acrylic paint instead. ...Now to turn it into Happy Mail! I folded it up and addressed it. Here's the front and back of it....


According to Sea Lemon, this galaxy is Orions Nebula
...I wanted the work to sparkle, so I used a Stardust Gelly Roll pen to stipple in some twinkles. :)


Here's a shot of all the crap I used! 

Thursday, November 6, 2014

Somethings...

...from the 5 things...


    I've finally got something made for my 5 Things challenge. To recap, My arty friend Sandy and I, have sent each other 5 things that we don't use from our art stash. The challenge is to make something from the things that we were sent. We could make one thing with all the elements or a bunch of things using all or some of the elements. I've decided to make two projects. One is a small project, which is what I will share today. The other project will be a little more tedious. It'll take me some more time to get that one out. Anyhoot, here is my small project.....winner's ribbons...


...at least I think that's what they are called!...you've seen them before...They are the kind of ribbons that you see people, mostly at fairs, win for a pie, or an animal and such. Except mine are altered ribbons. :)


Here is a close up of the first one that I made. Among the five things that I was given was construction site stickers and ribbon. If you look around the rosette, you will see traffic cones! Those are part of the construction chipboard stickers. The ribbon that I was given....it's the red and white lacy bit. :)


Here's a close up of the bottom half. Yes, it's for a Diva! ....and Diva's can be a little scary! So, I added some more of the construction stickers...."Caution & !!!!." Oh, I also dropped a dot of hot glue on accident. I knew that I wouldn't get it off with out tearing the paper, so I added more. One last element of the construction stickers went under the red ribbon. I lifted it up so that you can see the barrier sticker that I placed there. When it's down, it makes the gray part look like another kind of ribbon. 


Here is the second one that I made. "Proper Lady." In this one you can see the grunge board circle with the butterfly on it. In fact all of the ribbons have the grunge board circle that I was given as part of my challenge. The red ribbon, it's still there. Take a closer look.....I bleached it. :) Now it's the white lacy ribbon that you see above. ....Yep, another construction barrier sticker graces this project. 


Here is the last and smallest ribbon that I made. It's using more of the bleached ribbon. The yellow part that you see hanging down is the packaging that the construction stickers came in. Out of all of them, this one is my favorite. :)

If you want to see the 5 things in there original state, hit this link to my earlier post. 5 Things Challenge.


Wednesday, November 5, 2014

November Mail Art

...Pomegranate... 


    I've just finished one of my November partner's Envies. Thought that I would do a walk through with you on it, but also an update about the 5 Things Challenge. There are two projects that I'm going to make with the things that Sandy gave me. One is small and easy to make. The other, with the fish tray, a little more complicated. I'm going to be using a drill on the tray! Oh no! Power tools! LOL! I've got some elements worked out for each project already, but I'm still going to need a bit more time. So, without further a do, here's the Pomegranate walk through....

    Yup, you guessed it...it starts with a simple sketch. I'm using a kraft envelope from The Paper Studio.


I sketch the pomegranates in pencil. Then line in a black Micron pen. Cleaned up the pencil marks with a kneaded eraser.


    So now the fun part! I'm using mostly color pencils this time. I have three different brands of pencils! I was fortunate enough to have a friend gift me some Prismacolor Pencils. (Thanks Tracy!) Besides that I have Sargent Art and Crayola. I use as many Prismacolors as I can. They blend the best. However, If you're like me and can't buy the best....don't think that the cheaper brands can't do great work! I like that my cheaper brands leave lines, instead of blending. They give my work texture. :) 


    In the above picture, I started with my deep red. I thought of where highlights might go and went a little gentler with the color on those spots. I brought in some yellow and orange. I used those colors where I thought the fruit need highlight and where the fruit might have a lighter color naturally. 


I used two different kinds of purple to do some shading and a white pencil to add shine. I layer all of the colors. If I don't like how dark something is I layer a lighter color over it. To make the branches look a little more realistic, I used two different kinds of brown. First a dark brown. Then a lighter brown. Black goes where there are shadows. I finished those with touches of white. The leaves were done with a blue green color first. Then lite green in spots. Finished with some yellow. I hardly ever use one color on an object


I want to enhance the drawing with a simple water colored background. I'm using a Derwent Inktense water color pencil in Iron Green. I color around the Pomegranate fairly dark. Lighter as I get further away from it. Oh, forgot to mention, I used a scrap of kraft paper to see what my color would look like. So don't throw away those little scraps of paper peeps. They come in handy as a sampler. Anyhow, I took a brush loaded with water and activated the color pencil. I brush water gently in the dark areas. Scrubbed in tiny circles and dragged the color outward. 


Here is the front completed. I added the address, highlighted with my white pencil, outlines with my black Pentel Color Brush pen and added some stippled sparkle from a Sakura Stardust pen. Finished it out with a date stamper and rubber stamp.


Here's the back with a wax seal.