Friday, September 12, 2014

Beard Papa's

....cream puffs @ the mall....


   This evening the kids and I got out of the house. We went to the place that I loathe the most...the mall....I guess there just isn't anything that I want there. It's too bad, because we have a beautiful mall here. Anyways, I went to the boring stores, (according to my kids,) JcPenny's, Macy's and Sears. After my "boring" stores and some putting around at some of the stores that the kids wanted to look at, we stopped by a new place called Beard Papa's. I've seen one of these shops before, but never tried it out until tonight. 


  As you may have guessed by the title, it's a cream puff shop. You can pick a flavored puff and different fillings. There's other stuff too, but you gotta eat the puffs! ...I wanted to get them to go, 'cause I wanted to scarf the thing down in the privacy of my own home, but NOooo! The kids wanted to eat it right then and there. So, I gave in.....


I knew these suckers were going to be difficult to eat. The kids soon found this out.....


The two top pictures are of my eldest, Josh. The bottom left is Jeryn, he's the messiest! Jonah at the bottom right, acting like he's got it covered...no worries....


Nope, not easy at all! LOL! A big blob came out and fell part way through his hair....ewe!!


Here's what Jeryn got. Cookie puff with chocolate cream. Gee, what a blurry picture...tsk tsk! "Hold it still Jeryn!"


Ah, that's better....it takes two hands! Yeah, ordinarily I'd say we look pretty stupid, but no one was around. Mall was about to close. :)


Mmm, yum! Here's mine...and I'm a pro at eating it....ha! Not really, but like I said, no one was around.


What did I have? Chocolate puff with Dulce De Leche....mmmm!

Wednesday, September 10, 2014

"Cereal Killa"

...block print tut....


   As per usual, I joined a swap on ATC's For All. (AFA) This time the swap is for block printing. The swap host Ty Hannigan, is gracious enough to keep our printing skills going, with keeping swaps regularly posted. Thanks Ty! Anyhoot, let's get on with it shall we?! 

This time the theme is "House Hold Impressions" The print can be of anything that you might find in your house. Some of the suggestions were, plants, tools, toys, furnishings, still life...etc. I decided on a spoon...here's the finished work...


Yup, you may recall on my post for the "Creative Blog Hop," I often find the need to add lettering to my works. The idea, not my own. I saw it on Etsy somewhere....but it was of an actual spoon embossed with, "Cereal Killer." 

As always, it starts with a sketch....


I've sketched the spoon on tracing paper. (It's helpful to have a scrap piece of white paper under it.) Draw your lines darkly, It'll help when you go to transfer your image to a block. 

The block that I am using is Speedy Carve. It feels just like an eraser...which, by the way, you could use to carve small stamps! 

Take your sketch and turn it over. Carefully, so you don't smudge your block, tape your sketch down. Because you just flipped your "right side" sketch over, your image is now reverse on your block. You need a reverse image on the block, to print out correctly....follow? (Sorry, sometimes I feel like I've lead you on a twisty turny explanation!) ...anyhoot, it's important to have a reverse image with lettering...not so much for non lettered. Have it taped? Okay now let's burnish it down. I used a bone folder...

Lift up your sketch and take a peek....everything transferred? Good!


From here...I start to carve, but for some, it's difficult to know what your carving away and what you're leaving behind. If you have much difficulty, take a fine tipped marker and color in the things that you want to print solid. In my case I did the letters to remind me. 

I'm using Speedball carvers...they're pretty much the easiest to find and economical. I would love to get my hands on some Japanese made carvers. I saw some at Blick.....$20 dollars a pop! so, Speedball it is! I got mine as a set. I got two carvers with a bunch of different interchangeable blades, that store in it's handle.


Start carving....


Once you're done carving....do a test print. I don't need it to be the best quality print, so I'm using a regular stamp pad to ink up my block....


Make any final adjustments you need. (You're only adjustments will be removing more of the block...) When you go to make your final prints...use a block printing ink. I use the water soluble kind. I like that I can add more water, should I find it too thick. There are ways to adjust other inks....I just find water easy. Also, in my short experience with block prints, I've found Bristol paper the easiest to print on. 


Monday, September 8, 2014

Matchbox Assemblage

...teeny tiny creation...

   My arty friend Sandy of Artfullymade4u.blogspot.com has lured me in, to try out matchbox assemblage. I have been check'in these things out on Pinterest for some time now. They are crazy cool and just the right size for collecting. However, if you have fumbling fingers like me, it can be REALLY challenging! I stuck to it, though, so here are two that I have done...

I start off with a piece of scrap paper...(I used Bristol on accident...was suppose to be watercolor paper.) 
I cut the paper so that it's width could fit in the box. I shoved one end snugly in the box and creased the paper, with my finger at each end...going back in forth until all I was left with, was the little tab. It just worked out! I didn't measure this scrap...but I thought, "Great it's a pull tab."

So now, on to the sketch! The sketch as you can see below is of things in the sea. There are some fish, a crab and some sand dollars....
In the first pic of the cluster, I started with a pencil sketch. Next, I went over all my lines with a Micron. Then some color from Inktense watercolor pencils. I couldn't use too much water, because it's Bristol paper, so I went really gently with a brush not loaded with too much water. Bristol will pill with too much water or wet mediums.

At the other end of the strip, I did some sand dollars. I scribbled some Inktense watercolor pencils on a separate piece of paper and filled in around the sand dollars. Some of the color I used as shadows as well. There are about three different blues that I used in that spot. To finish it off, I added some water droplets and some stipples of black. (Look at my older posts I have a tut on water droplets.) I stamped a little flower with my sig too...:)

Now let's see the B-side...


I took some cheap  yellow Acrylic paint and dropped some at the beginning of the strip and smear it across it's length with a junk mail card. Next, while the first layer is still wet, I put some drops of orange and more yellow....smeared that across as well. I liked the way the first swipe turned out, so I let it dry that way...

Waiting for paint to dry is agonizing! 


Okay, background is dry...going in with some more paint! First I took one of those gumball egg containers and dipped it in to some green paint. Did a few cirlces...un-neat as usual! Then I took one of my home made, junk mail stencils and did some wonky circles. 


 I wanted the circles to pop a little, so with my finger, I painted some off white highlights. With some Inktense scribbled on another paper, I shadowed the spots as well....Then double BAM! Date stamper and my personal stamp. :)


It's almost done! I took some paper that I have received from a friend and wrapped it around the box. I used Tombow glue to keep it secure. (...and nope not a clue what the paper says!) Next, I used a gold metallic Sakura Gelly Roll pen to edge the box. At this point I wasn't sure what to do....I remembered that I had some shells with holes that can be threaded. So, I used one of those. For the life of me, I couldn't get a thread to go through it! That's when I came across some wire....I wrapped that around the box a couple of times to keep the shell in place. Finally, I used blue Distress Ink to age the piece.

Here is the finished piece!


Saturday, September 6, 2014

Crab Postcard

...the inside pocket....

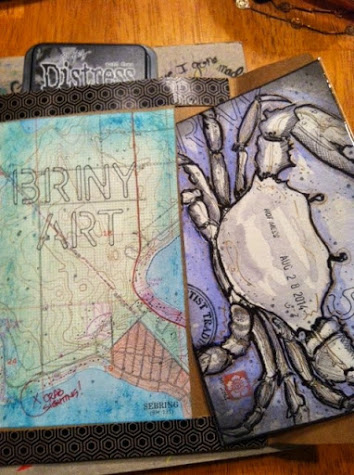
   Okay, so on my last post you saw the whole booklet thang. Today I'm gonna show you the progression for the Crab Postcard that I had tucked away under the Briny Art panel. 
As usual, I start off with a simple pencil sketch. I'm not worrying about shading. I just want it's basic shape. I'm not very good at drawing from memory, so I hunted down a picture from Pinterest, that I could look at as a model for my crab. 

Next, I went over all my lines with a Micron pen. If you are trying to follow the way that I am doing it, let me just say, that you can use any fine tipped felt pen. It doesn't have to be Micron. Sharpie is my second go to. Heck, using several different sizes of tips, also is a good thing. It adds a lot of interest to the work. :) Keep in mind, though, if you are going to wash over it with watercolor, go with permanent ink. (Unless you want your lines to blur a little...which I sometimes like!) Just goes to show, it's difficult to make a mistake...and if you have, you can make it look intentional!
 I erased all of the pencil lines with a kneaded eraser. Then proceeded to do cross hatching as a method to make the shadows and roughness of the crab armor. Some artist can make the neatest of cross hatches...sometimes it looks like a machine did it because so perfect. ...Uh, I'm not one of those peeps! My cross hatching's are messy. ...Along some of the edges I went really dark to define the crab....
Starting at the top left pic...I further define the crab with a black Copic marker. This is one of those markers that might blur or bleed a little with watercolor, but I like it. ...Which takes me to the next pic in the cluster. I am adding some color. This time I'm only using two colors. the first one is Panye's Grey from a Inktense water color pencil. I don't want it to be a strong color, so I scribbled on a scratch piece of paper and loaded up my brush with water. ...I daubed up the color and wash it over the areas of the crab that has shadow. I leave spots white as well....it makes it look like a spot that has shine...

The second color comes from a cheap pan of dry watercolors. I guess I can call it violet? To add this color, I do a water wash over the area that will receive this color. With a brush full with water, I load my brush with color. I go in closest to the crab and work my way out. Allow the water on the paper to move some of the color around. You can lift your paper to help the color move and drip....

 Above is a close up of how I am adding the Inktense watercolor pencil. Some people will scribble on a non porous surface, but I like to use my scraps of watercolor paper. It helps me see what the color will look like on the actual paper. Anyhoot, the last pic in the above cluster shows that I have added some gold lines to the crab. There is no rhyme of reason to it....I just place in spots that I think make it look cool. :) The gold pen that I used was Sakura Gold Metallic Gelly Roll. Here it is close up...


 The pic below shows my finishing touches. I stenciled in "Briny" and "5" ...no reason for the 5...I just wanted to add some interest to the work. At the bottom, I used a rubber stamp from Cat's Life Press. (I believe there is a link to the right of this post. It's a great on-line rubber stamp store.) I only used half of the stamp. The full stamp says, "Artist Trading Card." Let's see, what else? Oh yes! I date stamped it, stippled silver dots with a Sakura Stardust Gelly Roll pen, aged the edges with Distress Ink and stamped a little flower with my sig.


Friday, September 5, 2014

Mail Art Booklet

Booklet Construction

   So, for those of you that don't know, the group that I lead is celebrating it's 2nd birthday. Envie Addicts Unite! has been around for a long time. To celebrate we are stepping outta our comfort zone and doing some more unusual mail. Some of the players are sending objects, while others are going to try to send different shaped envelopes and postcards. I've sent out my September mail, so I can share it's construction here with you. :)
   Before I do though, let me show you the finished project, that way you can decided if you want to know how to make it. The one that I'm showing you was sent to a good friend of mine, that I met on AFA. (ATC's For All) She is one of my swap "buddies." (helper) I thought it fitting, to send her something more personal. The first pic shows the front....
I used a few real stamps...Wasn't sure how much I should use, so I guessed, then added more! In the bottom left corner I added faux stamps. The black edges that you see is Washi tape. It's lining the whole project. The blue leaves....I made a stencil out of junk mail....drew in some veins with a white Uniball pen. ....and of course....a few rubber stampings fill up the blank spots nicely. 


The above pic is showing the back of the project. The floral Washi tape is there just for it's trip through the mail. I've asked my friend Juanita to remove and discard the tape. Kinda self explanatory. It's got more rubber stamping, stenciling and a red wax seal. So now let's open up this booklet...


Here it is part of the way opened. Not sure how well you can see the pic. (My comp is small, so I can't see the smaller writing...but basically it's a poem about Persimmons....'Cause we're ushering in the Fall soon. On the opposite side is a map that I aged with blue Distress Ink. 

Let's open this booklet up all the way...


Now it is completely opened. If you haven't guessed yet, these are three envelopes glued to each other to form the booklet. The fun thing is the pockets! On the first panel, to the left, I copied down the poem "Sea Fever" by Robert Frost. It's one of my favorite poems. To compound the idea of the sea, I added a postcard from my recent trip to the beach in Washington State. I wrote a personal note on the back of it. Here it is a little closer...


On the middle panel I added a "Found Relative" card and wrote a personal note to Juanita all around it. In the pocket is another postcard, but this time it is of an artist that I admire, Wayne Thiebaud. Another note is scribbled at the back of this postcard..


I have to have some original art up in this thing! So in the last panel in this booklet, I added a postcard done by moi. :) the front panel is of a map, that I aged with a blue Distress Ink. I've X marked a spot that says, "Crab Sightings"...and yes, it's because the art is of a crab.


Are you still here? Still interested? If you are, no worries, the construction takes less explaining! Ha! First, grab three envelopes of your choosing. I'm using a kraft paper envelope by "The Paper Studio" I bought mine from Hobby Lobby, but I have seen it at Micheal's and Joann's as well. Next....


...using a paper trimmer, cut the bottoms off two of the envelopes. Not a lot, just enough for there to be an opening. Add glue to one of the flaps and slide it into the bottom of one of the cut envelopes. Do the same for the next envelope. As far as glue, I'm using Tombow, but any white glue should suffice. In the last pic, of the above cluster, you can see it all strung together. It's practically done! Let it dry a little then move on...


You don't really have to do this part, but I seen it on Pinterest and liked how it looks. I used Washi tape to line the whole project. I liked the more mature look with the kraft paper and black lining, but think of it being colorful, light and fun! ...Anyhoot, there ya go! A blank space to decorate. If you make one, let me know. I'd love to see what you've done. :)

Wednesday, September 3, 2014

Gryphon...a progression drawing...

Gryphon Progression Drawing

   I'm back at it again....my last doll for the "Two Sleeve Art Doll" swap on AFA. (ATC's For All) All of my dolls were of a character from Alice in Wonderland. I had a request to do one of the more obscure character's, so I decided on Gryphon. My only regret is not being able to fit in the wings and lions paws....As always, let start at the beginning, with a pencil sketch...


In the second pic I lined all of my work with a Micron pen. Next, with Derwent Inktense /Watercolor pencils, I colored in the eye and beak. The eye has the color "Baked Earth" at the top of the pupil and "Naples Yellow" They are slightly blended together...(a more impressive look on bigger eyes!) I then took the same yellow and colored the edges of the beak. The whole beak will be yellow, but you can load your brush with water and drag it towards the center. It'll give more depth to your drawing.
When the yellow dried, I took a "Payne's Grey" Inktense pencil and lightly colored in areas that I wanted to have shadows...it was also partly the color of the beak.....I loaded my brush with water and did gentle circles and manipulations to where the color would drag through. The last pic above shows the body being colored in. I used "Baked Earth" again. I went dark on all the edges and also where there are suggestions of feathers. To add shadow, I scribbled some "Payne's Grey" on a separate paper, where I could daub it up with a load brush of water. It's hard to see it in the picture, but those subtle color variations will show to anyone holding the doll in person. ;)
The above shows a better progression of the above explanation.....

Background color can be such a hard choice to make! I settled for Prismacolor's "Tuscan Red" marker. Don't forget the small details! I used a Uniball Signo pen to put a glint in it's eye and a shine on it's beak and feathers. 
Yup, again with my final touches...A quote written in the Uniball pen. Gryphon lined in black, using my Pentel Colorbrush. Distress Ink for the edges...sparkly rays and stipples from my Sakura Stardust pen, Stenciled in "G's"and a good 'ol whack from my date stamper!

Here's the finished work...

Monday, September 1, 2014

Creative Blog Hop

   I am so new to this blogging thang! ...but already, I have made a few connections of some of the most caring, nurturing and creative people! One of them, a good friend of mine Sandy, from Artfullymade4u.blogspot.com has invited me to join this Blog Hop. What is this "Hop" that we speak of?! Basically, it's a way to share blogs that you enjoy following and to get your own blog seen by more people. ...and yes, it the creative kind. The bloggers that you will see in this tour of blogs are those that are artist and crafter's of many different kinds.

   The peeps that started this Blog Hop, asks that I answer a few questions, so that you can see what it is that I do! So here goes! First, they wanna know what I'm currently working on. Bah, it's a secret! LOL! Let me explain. Through ATC's For All, I head a mail art group called, Envie Addicts Unite! We mail covers/Envies to assigned partners every month. One of our rules are, not to show the art until the receiver has gotten it first. Although technically, I could show it here, because it's not on ATC's For All (AFA)....my partner reads my blog! So instead, let me show you some Envies/covers that I have done in the past...These are the ones that I am most proud of...
I am known to draw a lot of birds and fishes. This one came out better than I had expected. Sometimes I can hit the mark with my drawings, which I feel I did here. However, trust me, it isn't always that way. 
This one can help to answer another question that is posed to me, which is, "Where do you find your inspirations from?" To answer, most times it's from Pinterest. As most of you know there is a myriad of subjects, including art that can be viewed on this site. I guess you can say that I use the pictures as my "models" while drawing. The above picture was done because I saw another artist's simple line drawing. I mimic the drawing, but wanted it to be my own. So I changed it up by making it an ink and watercolor version of what I saw. Another thing that you can see on Pinterest, is our Envie Addict's Unite! board. :) *Shameless plug!

 Ah yes, and then there is fish! .....we make Enive's for people celebrating a birthday each month. I thought, "How can I incorporate my love of fish with a birthday?" Well, the above is what happened! 

Hmmm, next question...what was it....oh yeah, "How does my work differ from others in my genre?"  Well gee, what is my genre?! I guess I am a sketch artist, specifically ink and watercolors. However, I've been known to stray a bit. I think every crafter does. When you love to create, we tend to do it in all parts of our lives. Am I skirting the question! Sorry! I guess my work differs because, I can't just make a drawing and have it stand alone. It almost always has some lettering in it. I guess I can't fully express through visual alone, so I always have to add a word(s) to give something my mind set or feeling about something. Here are some letter enhanced things I have done in the past...
Here is a Rolodex card that I had done...lettering present...

This one and the one below are from a paper doll swap. Above the inspiration is from Pharrell's famous song, "Happy" ...the below pic, well....it explains it's self!

 The last picture is of a lino print that I had done for a swap. :)

Last question, but probably the biggest one is..."Why do you make art?" ...well...why not?! Okay, ok, I know that's the easy way out. I do it because it's fun. I enjoy it....and I have made some wonderful friendships along the way. Aw sweet, no?

Lastly, but not leastly.....I'm suppose to introduce some blog friends of mine. I feel a little sheepish on this part....Sandy, had given me this assignment....(she's a former school teacher) and I probably would have gotten an "incomplete!" ...ugh, and I cringe to think that she's seeing all of my grammatical errors! I basically treat commas like earrings! If it looks good dangling there, I'll put a comma! LOL! So, why am I embarrassed...because I was suppose to ask the people that I introduce to play along in the Hop! I've only asked them today! I will still introduce them and give ya their links...but I'm still waiting to hear if they would like to participate. 

I have three peeps to introduce to you. They are all players in Envie Addicts Unite! They all do more than just mail art....
My good pal Renee of Elephangaroo.blogspot.com....she does some crazy wonderful sketches. You'll HAVE to put your eyeballs on her blog...I just couldn't put it in words the amazeballs things that she does!

One of my newest EAU members Alessandra from Artnewbiett.blogspot.com doesn't just do Envies, she's got some fresh new post on journaling....I can take a page outta her book on how to do up an art journal! Pun intended of course! (Oh! ...and I just got word that she will be doing the Hop for Monday, September 8th! I'm saved!)

Finally Sara, all the way from Slovenia! I've done a few trades with this gal and I am always happy with what she sends me! <3 ...but like I said....we artists and crafter's rarely stick to one thing. Take a snoop around her blog for some more wonderful creations!  She at: Craft-Gumbek.blogspot.com