
...fold up some stars...
Little paper stars can be addicting to make. Once you get the hang of them, you can do them almost mindlessly in front of the TV or while chatting with some friends over tea....or what ever it is you drink while chatting with your friends! Eh hem....
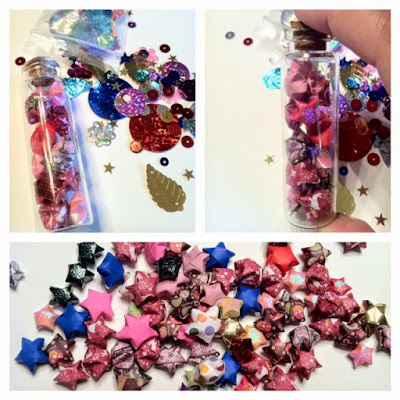
What can they be used for? Personally, I like to throw them into happy mail or in a little glass, cork stoppered, bottle. It's just a fun little surprise...a keepsake. I've seen other people string them up for garlands...while others may use it for a mixed media project.What ever you are using it for...they are fun to make. :)
Below is a pic of one that I had made up recently. I came across a little packet of sequins someone has gifted me. There was some stars in there, so I added them to the mix. (Thank you to whom ever sent me those!)

To start you will need some strips of paper. You can buy them ready made at a store like Sanrio. (Hello Kitty shops.) Sometimes even at a craft store. However, you can just make your own. First, don't use thick paper. Use something that is like copy paper. Scrapbook paper works great...it comes in many prints and colors. It's also comes 12x12 inches....which is the length that the strip needs to be. As for width, that's up to you. I find that 1/2 an inch is perfect. You can even go a smidge smaller. Use a paper trimmer to cut your strips. Don't use scissors...it'll take f-o-r-e-v-e-r....and it won't come out even.

Now that you've got your strips, you need to start with a simple knot. As you can see in the photo below, you make a knot and then squash it down. Try to pull the paper, so that the points all match up. (See 3rd pic in cluster below.) Next, flip it over. See the tail in 4th pic? Tuck it in. It should look like a 5 sided polygon at the end of your strip....

Now take the tale and flip it down onto the star. It's going to want to naturally fold with one of it's edges following the edge of the polygon. Soon you will find that you will just keep turning it in your hands in a wrapping motion. ...'Til you get to the end with a small tail again.

Tuck the tail in to the star....

Now take your thumb and bend in one of the sides....do that all the way around. You can pinch and bend in the sides as you go. The star will start to puff up. It'll look completed, but turn it over and give it a few more pinches. That's it! soon you'll have a crazy amount of stars!
Check out your craft stores for kewl containers....

Awww I love those stars! Ok, I'm going to try this again. I have had zero luck with star folding but you've got me inspired!
ReplyDeleteYou can do it!! :)
DeleteThis is just so sweet!!! I love it and wished I could do that my hands are not good at things like that but might give this a go. ManonX
ReplyDeleteThe first couple of stars might not come out, but keep at it....after two or three....it'll go smoothly. :) (At least that's my experience.)
DeleteA few years ago I went on an origami star making spree with these little guys. I ended up making a garland out of mine. I like the idea of putting them in little bottles! And that lightbulb bottle is too cool for words!
ReplyDeleteThanks Donna!....I know that you are the Origami Queen where I'm concerned! :D
Delete