Friday, July 31, 2015

Block Bird

...stuffie part deux...


    So, I guess I just couldn't get lino block printing outta my system. I've joined in on another swap. This time it's birds. The swap is being hosted by Gaialuv of ATC's For All. The rules are that the birds have to be Mixed Media and they all have to fit in a 6x9 bubble envelope for mailing. The fact that they are going in an envelope is the reason why my stuffies are ...well...not very stuffed! LOL! Anyhoot, as per ususal...this all started with a sketch.


   The top left pic shows the transfer of my drawing, to the lino block. You can see this done in the last post as well. I go right in and start carving. If you think that you might smudge up your pencil image, line it with a Sharpie. 
   Originally, I had little "U" shapes for feathers on it's chest. As I was carving those out, the pattern that you see in the last pics started to appear to me. I thought it looked better than what I had planned, so I left it alone. Also in the last pics, you can see that I inked it up. This will show me what the print will look like. One last tip,...use a fine grit sandpaper or emery board/ nail file, to rough up the smooth lino block. Probably better to do it before you even start. (If you are using Speedy Carve...or something with an eraser like block...do not sand!) Sanding will help your block ink to adhere evenly to your block. 


Next, I do a test print on paper. Can't let the image go to waste. So, I printed several on watercolor paper, to use as postcards. :)


Here's my fancy printing area! Paper plates for my ink. I used two colors, red and orange. Worked the ink with a brayer, letting the colors blend in the middle. A soft cardboard under my work, helps to make the prints come out better. 


I then printed them out on my fabric. Cut them down to size and added some quilt batting. The glint in the bird's eye didn't print out well, so I decided to add a shiny seed bead for it's eye.


I went around each of these 3x with the sewing machine. I don't sew well, so I intentionally went wonky with it! Finally, I added red felt to the back and blanket stitched around the whole thing. Every other stitch, I added a sequin. Colorful frayed ribbon, was sewn in too, as a hanger. 


Saturday, July 25, 2015

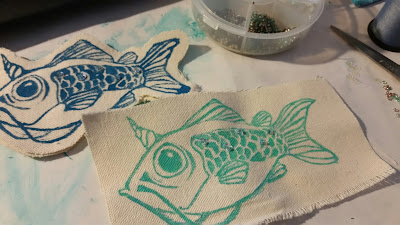
"Narfish"

...lino printed stuffie...


    A funky friend of mine, Nanner of ATC's For All, is hosting a swap that I entered. It's called Art Fish Frenzy. The rule is that the fish need to be approximately 3x5. You can do any style you want. So, I decided to do a stuffie. I thought that it would be easy, but it wasn't! However, that was due to inexperience. If I had to do it over, it would probably go down a lot faster. :) 
   To start this whole project, I started off with a sketch. This time around, I used tracing paper to sketch on. Also, to keep within the 3x5 rule, I measured out spaces to sketch within. Here's what that looks like.


There's the sketches on the top left. I decided on the one with a horn. I was thinking of the Narwal whale when I drew him. :) Next, I cut out my sketch and laid it face down on some Linoliuom. A little Washi tape keeps it in place. With a bone folder, I rub the back of the tracing paper. This transfers the pencil sketch. Before removing the sketch, I peek underneath. I want to make sure all of the lines are transferred. I go right in and start carving. If you think you can't trust yourself to not smudge the pencil sketch...line it with Sharpie


Here is the progression of my work. I used an Exacto knife to line fine areas to carve out. It helps to keep your carving tool to cut past a line from the Exacto. (Was that confusing?) The last pic shows the entire block, carved and cut to it's shape. At this point pencil or Sharpie lines should get washed away. 


Next comes printing. I'm printing these guys on canvas. Now that I have more experience, I don't think I would use canvas for projects as small as this one. I wanted to sew them with a sewing machine, but turning them out warped them. I ended up blanket stitching around them.
Anyways, printing! I tried fabric paint by Tulip. Didn't work out. It wasn't thick enough. I ended up buying Martha Stewart's multi-purpose paint. It looks like Acrylic paint. Along with it I bought the bottle of stuff that is suppose to make it a fabric paint. (I didn't use it.) I just used the multi-purpose paint as is. No matter what paint I use, it prints out dry. So, I did have to go back over every single one of them and do a touch up with a brush. 


Because I can't seem to do things easily...I added sequins and seed beads to each fish...


I added real leaders to the fish.


Overall, I'm thrilled on how they turned out!

Thursday, July 2, 2015

San Francisco's Financial District & Point Lobos

...adventure on one tank of gas...


    Every so often the kids and I go out, looking for some adventure. We haven't got a lot of money, so we stick to some simple rules. First, we go only as far as a tank of gas can take us. Second, we have a cheap lunch, but some where we haven't eaten. Finally, we stop where ever it looks like it's a good place to explore
   This time we landed ourselves in the financial district of San Francisco. It's an odd feeling being in the city with buildings so tall, they block out the sunlight. It's easy to feel small.


 We started strolling through the city. I felt really self conscious taking pics. People look annoyed when you're snapping away. I did manage a few though...and yeah it involves FOOD! 


There's Josh ordering up some Onigiri, or rice balls. A perfect food for consuming on a walk. The sidewalk was pretty busy and the shop teeny tiny....so my pics are lacking. However, here's a link for those of you interested in Onigilly


These are Beef Teriyaki flavored. :) 

Right next door was a place called Plentea. So, I'm not going lie. Their gimmick makes their product look even more enticing. They serve bubble tea's and coffee's. The gimmick...it comes in a tall glass milk jar container. It just looks SO refreshing. ...but then you drink it, and then you know, it was worth it. Click the link on their name to see more pics/info. Here's my only picture. Josh looks totally happy to try his drink! He and I got Coffee Milk Tea. Josh has his with Mochi bubbles.


Jeryn & Jonah got Nutella Milk Tea.


Two thumbs up for the big city.

...next up...Point Lobos and the Sutro Baths...
From here we saw whales, but I don't have a proper camera to get pictures of them. However, I did get some fun pics all over this park. 

Here's Jeryn & Jonah standing on the Sutro Baths. Check out the link above. The history behind the baths are pretty interesting.


Here's a look from the cliff above...


My weirdlings in a cave...


A brave dude at the edge...


...but this pic sorta sums us up...feel's like we're the "Thrill Society." (Even though our thrills are pretty tame!)