Sunday, September 28, 2014

Key Hole Doll

...Amanita Vs. Black Widow...

   An art friend of mine, that I had the pleasure of meeting in person recently, has gotten me into making Two Sleeve paper dolls and now, Key Hole Paper Dolls. Named "Two Sleeve," because it takes two penny sleeves to cover them for mailing. Key Hole Dolls are a little more obvious. They are the shape of an old fashion key hole. These however have some extra width of paper that can be folded back to make the dolls stand. 
   The doll that I'm sharing today is based on one that I did in Ruth Morris's first doll swap. That two sleeve doll was simply Amanita. (*Which happens to be a poisonous mushroom.)  Sorta looks like a chic's name too, don't ya think? Anyhoot here is the two sleeve I did way back when....


There she is with Chrysanthymum....:)

This time Amanita is a little annoyed. She's no longer happy like the above pic....someone's invaded her mushroom glade. ...This is how I got Amanita Vs. Black Widow...
They start off as a simple sketch.


I use my trusty mechanical pencil and kneaded eraser to sketch. (Lot's of erasing!) Next, I lined the sketch in black with a Micron pen. Then in brown Micron on the skin. Once that was done I used my kneaded eraser again to clear out all of the sketch. ...Like last time, I edge her hair in lite blue. 


Now for some skin. I went in with Copic's "SkinWhite/E00" I covered the entire skin area with this very pale color. Next I took a darker color by Prismacolor, "Eggshell" This time I'm only going in on the spots that might be in shadow. For example, under her hairline, under her nose, eyes and chin. I don't have a drawn line going from her brow to her nostrils, but I'm using my color pen to make those lines. To give her a more healthy glow, I go in with some blush. I used Spectrum Noir's "PP3." It's basically a barely there pink. I add this color to the apples of her cheeks, the tip of her nose, her chin and across her forehead. I go back over all of the skin with one of my skin colors to have it all blend together


Above, I colored in her eyes with the same lite blue I used for her hair. Under all the hair and places of shadow I used a pale gray. 


I'm using Inktense color pencils for her cap hat. Cherry, Tangerine and Sun Yellow. With a liner brush full of water, I blend the colors together. I don't worry too much about the white spots. I suppose I should use mask, but I just go back over it with my Uni-ball white pen


Ah, there's Black Widow.....
...just like the original doll, I'm going with a black background. I love the way black sets everything else off. I used Copic black....


Everything's black...but I decided to go with dark gray in the center. Dunno why, just felt right. Black Widow is looking too white. I eventually give her some hash marks to give her more of her color. 


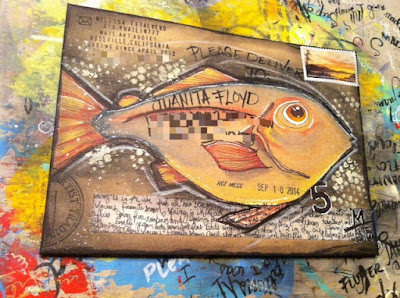
Before I show you the finished project. Here is a close up of some of the added details. Webs make an appearance....they are jeweled with a few dew drops. Taking cues from Charlotte, this spider spun some words too.  I slammed a date stamper on this and laid out some silver speckles.


Here is the finished piece....


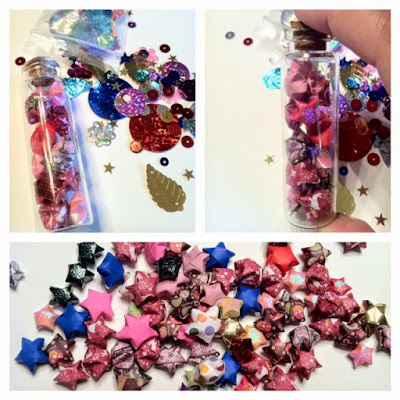
Here's all the crap I used!!
(Sorry, picture is unavailable.)


Saturday, September 27, 2014

Tiny Matchbox Mail

...super small parcel...

    I've finished up the last of my match box trades for a swap. These little works are so much more harder, than I first thought they would be to make! So what did I choose as my final project.....teeny tiny parcel package! Here are the three completed boxes...


The box at the top right, is what I'm sharing with you today. I begin by cutting a piece of brown paper that will cover the box. I used a bag that I got from buying some pens. The brown paper is really thin. Don't use something thick like grocery store bags. Your box will not close. 


In the above pic, you can see that I wrapped the paper around the box. I then put a tiny dab of Matte Gel Medium to glue it in place. Next, I snipped the four corners of the paper over hang. Fold them in tight, first without glue. Then, unfold them and smear some more Matte Gel Medium to the flaps. Re-fold and smooth out if necessary.


Now for the inside drawer. You can't have too much bulk on the drawer, or it won't slide back into the matchbox cover. To avoid that problem, I cut a strip of paper the went across it's length...including the inside of the box. (See pic #2) I use my fingers to fold all of it in place. Then, glued it all down. There is no paper on the sides of the drawer. When it's all closed up, it looks like it's been completely wrapped. 


I decided that I would add some tiny mail and some other Happy Mail elements. The above is my attempt at a postcard. Bust out the Micron pen to do your writing! ...a liner brush is used to do the smallest water colored fish I've ever done! The little note says, "Brown paper packages tied up in string, these are a few of my favorite things."


A note with a drawn in wax seal. I used a gray marker to add shadow.


Addressed to Mr. & Mrs. Friend, from Mrs. P. Pal....
I added the postcard, letter and some sea shells, stars, tiny clothes pin, leaf sequins, an old postage stamp.


Here's my completed project. I used a real label and cut it down to size. With the scraps of the label I made some postage stamps. I botched the hand cancellation drawing....but whadaya gonna do?! Baker's twine finishes it up.


Thursday, September 25, 2014

D.I.Y. Envelopes

...customize your Envies!

   A friend of mine was asking me to make her some templates. One of them being for an envelope. So, I thought I'd do up a tutorial. Anyhoot, why would you want to make your own envelope? The biggest reason is that, among our swap group, we need sturdier envelopes. A lot of us use wet mediums that warp and pill regular envelopes. 

   For some time now I've been making watercolor paper envelopes. It stands up to quite a bit of abuse, including going through the mail system. Also, because most of us don't send anything inside of the envelope...there will be no need to add cardboard to keep them sturdy. It will stand on it's own. So, let's begin! I start off with 140lb watercolor paper


   In the pic above you can see that you will need a score board, ruler, bone folder, and a ready made envelope as a guide. I place the watercolor paper on the score board and the envelope in the middle of that paper. (I just eyeball where the middle is....you can measure and be exact if you wanna....) The picture above is exactly how I start it.....paper verticle...ruler following one edge of envelope. 


    With the bone folder I made the two vertical scorelines.....then reinforced the fold by running the bone folder several times over the fold. Turn your paper horizontally....You will make a small flap at one end and one larger flap at the other end. (I also eyeball the sizes of the flaps....or you can use your ready made envelope as a guide.)


   With scissors cut the corners out. For the two long flaps, cut a smidge under the score line. It will help your end flaps close properly. 


   Now you have your corners cut out. To give your envelope a finished look, use a corner rounder punch on the bottom and top flaps. ....you can even use your scissors to round those corners. Most people will not notice that they are not perfect. Besides, your gonna put some amazing art on this blank....it will detract attention from any imperfections. 


Here are a few of the products that I use for making envelopes. Forgive me, I forgot to include corner rounder and scoreboard....but I'm sure you know what they are. When I am ready to close up the envelope, I use Tombow glue. However, any white glue will do. I was also gifted a bottle of Lick and Stick. (The green and white bottle) I don't make most of my envelopes to open, so I haven't used this stuff much. Just thought you would like to see your options for envelope sealing solutions. :) 


Monday, September 22, 2014

Mail Art Co-op!

....finish me....

   I got an interesting piece of mail on Saturday. It's an 8x10 canvas with a blue background painted on it and the words, "Finish me," pasted on. It was sent through the mail, "naked." No covering, sent as is with the stamps and addresses on the back. 


Ha! I love the play on my name!


 I was scared that I might mess up the canvas. It's not like I could take a pencil to it and erase. So, I looked back to something that I have already drawn. The above is a Rolodex card that I have done in a style by Geninne of Flickr. It's my inspiration for the canvas. As always, I started with a simple sketch.


I will spare you the details this time around. You can see how this thang progresses


Here is the finished piece...


Sometimes the numbers in my art mean something. 922 14 is the date today. :) 


Instead of the long explanation, you can take a peek here at the things that I used to finish the art, including the homemade junk mail stencil. :)


Saturday, September 20, 2014

Wish Upon A Paper Star

...fold up some stars...

   Little paper stars can be addicting to make. Once you get the hang of them, you can do them almost mindlessly in front of the TV or while chatting with some friends over tea....or what ever it is you drink while chatting with your friends! Eh hem....
   
   What can they be used for? Personally, I like to throw them into happy mail or in a little glass, cork stoppered, bottle. It's just a fun little surprise...a keepsake. I've seen other people string them up for garlands...while others may use it for a mixed media project.What ever you are using it for...they are fun to make. :) 
   
Below is a pic of one that I had made up recently. I came across a little packet of sequins someone has gifted me. There was some stars in there, so I added them to the mix. (Thank you to whom ever sent me those!)


   To start you will need some strips of paper. You can buy them ready made at a store like Sanrio. (Hello Kitty shops.) Sometimes even at a craft store. However, you can just make your own. First, don't use thick paper. Use something that is like copy paper. Scrapbook paper works great...it comes in many prints and colors. It's also comes 12x12 inches....which is the length that the strip needs to be. As for width, that's up to you. I find that 1/2 an inch is perfect. You can even go a smidge smaller. Use a paper trimmer to cut your strips. Don't use scissors...it'll take f-o-r-e-v-e-r....and it won't come out even. 


   Now that you've got your strips, you need to start with a simple knot. As you can see in the photo below, you make a knot and then squash it down. Try to pull the paper, so that the points all match up. (See 3rd pic in cluster below.) Next, flip it over. See the tail in 4th pic? Tuck it in. It should look like a 5 sided polygon at the end of your strip....


 Now take the tale and flip it down onto the star. It's going to want to naturally fold with one of  it's edges following the edge of the polygon. Soon you will find that you will just keep turning it in your hands in a wrapping motion. ...'Til you get to the end with a small tail again.


Tuck the tail in to the star....


Now take your thumb and bend in one of the sides....do that all the way around. You can pinch and bend in the sides as you go. The star will start to puff up. It'll look completed, but turn it over and give it a few more pinches. That's it! soon you'll have a crazy amount of stars! 


Check out your craft stores for kewl containers....


Thursday, September 18, 2014

Mail Art Progression

...mixed media fishy...

   Bored yet?! Hope not! Wanna walk through another one with me? ...Still here?....cool let's get started at our usual place, a simple sketch. Today I'm sorta feeling like it's an abstract kind of day. So, do'in my favorite thang....sketching a fish. Think of it as an almond shape, that has fins and an eyeball. That's simple enough yes? To sketch my lines, I'm using a fine tipped Sharpie and a Micron pen.


 What's that on the bottom you ask. It's just a piece of scrapbook paper that I have in my fodder box. I glued it down first. (Sorry, forgot to mention that.) Why is it there....well why not? No worries, it doesn't have to make sense and....it'll blend in and add interest. ....so hmmm, where was I? Oh yes, the sketch! I colored in the eye and added lines to all of the fins and tail. Vary the lines. Make them curve one way, then another. Now for some color. I'm using Derwent watercolor / Inktense pencils. With a dark orange, I'm only lining the fins and around the eye. I try to imagine where it would be darker, had I been looking at a real object. 


 Now in with some yellow. Think of it as a highlight. Where do you want light to hit this fish? For me, it's coming from underneath. I add the yellow along side the orange/red color as well on the fins. Along his back and near his tail a dark gray/green is added. With a brush loaded with water, I start to manipulate the colors. I do little circles where I added color. Then slowly drag them further away from it's beginning point. This will help to make your colors fade or show a gradation. It's better than having one flat color.It'll give your painting / drawing more depth. 


 The first place that we look at a living thing, is it's eyes. So, I want to go in and make the eye more of the focal point. I started off with just a solid black pupil. I added some white glints with a  Uni-ball Signo pen and also colored in one of the blank rings around his eye. Next, I took an orange/brown watercolor pencil and colored in the top part of the eye. Orange is colored on the bottom half....then a touch of yellow at the very bottom. Take a liner brush loaded with water, dampen the top color and slowly go into the bottom colors. 


 Some folks might stop at the point that I am at, in the first pic of the above cluster. Why? Keep going! ....If you can't think of what to do next. Let it sit in front of you for a few days. Add something from time to time. Anyhoot, I went further by darkening the edges of the fish. I colored first with a black Inktense pencil.....then, with yet another water loaded brush , I did circles near the fish....and dragged the color away from it. I wasn't happy with the naked envelope at the edges, so I used a black Distress Ink on the perimeter.


   At this point, are you happy with the outcome? NO! Add more! :) I darken the edges even more with a Spectrum Noir pen. I wasn't trying to be neat...some places are thick and some thin at the edges. Next I took some punchinella and acrylic paint to add some stenciled looking dots. it ended up being too light, so I went over some of it with Distress Ink. (Only what was left in my blender.)

  Done yet......ha...no! I added the addresses, some stamping, postage and some white lines quickly scrawled across the drawing. Hmmm, what else?.....


Ah yes, some stippled sparkle from a silver Sakura Stardust pen. ...let's not forget the back too!


   I use wax beads and a wax spoon to apply my seals. I also like to use a gold stamp pad, it makes the design from the seal, pop! This design is a Claddagh. Some of the meaning of it has been described as, "Loyalty, friendship and love." .......Okay, are we done now?! Yeah, I think so...


Monday, September 15, 2014

Weirdy Mail!

....mmm mail.....

   We had a bit of fun this month on Envie Addicts Unite...we decided to celebrate our second birthday with some weirdy mail. I tried out a thang that I saw on The Giver's Log.  Among some of the objects shown to mail, was a bottle of candy sprinkles and M&M mini's container. I chose to use the king sized M&M container. I emptied out the container and placed the M&M's "somewhere." :D

    Next, I took an air mail envelope, sealed it and wrapped it around the container. Then, I just shaped the envelope to the container....that way I can see where everything should be written and stamped. I added the address, a sticker and my mail art stamp. Re-wrapped the envelope, this time with glue, around the container. I used office clips to hold it together while it dried. ...To further strengthen the envelope, I completely covered it with clear mailing tape.....and of course added tons of postage....

Here's the front.....


The back....


The mail that I was sending was for someone that was celebrating a birthday. So I included a Washi tape banner. It was actually harder, than I thought it would be, to make! Maybe not for you....I just have fumbly fingers! However, I took a length of baker's twine and looped  pieces of Washi tape on to it. To give it the "flag look," I clipped the bottoms with a scissors....and stenciled in the phrase, "Happy Birthday." (Sorry, the picture below is temporarily unavailable.)


I had a bit more room in the tube...so hmmm, what to add? How's about some wishes to go with that banner? I took a tiny corked bottle....smaller than my pinkie and added some origami stars


The person I sent it to thought it was M&M's and hadn't opened the tube until we chatted on-line! Was kinda fun to have the surprise unfold in front of me. :)

Saturday, September 13, 2014

Crazy Bird Challenge

...an abstract bird tut...

   A few days ago a good friend of mine, that goes by the username Tandy, has shared an interesting bird tutorial video. The video shows you how to make an abstract bird without being stuck on where to start. A lot of us have this problem with sketching. We get a picture stuck in our head and try so hard to stick with it. This exercise helps you think freely...it gives you a little head start too. To see what I'm speaking about watch Carla Sonheim's short video here.


Just like the video, I made some loosely drawn circles on one square of paper and a flower shape on another square of paper. I used three different colors.....I believe that the video said to use four. I'm bad at following art instructions! I'm using a black Pentel Color Brush pen, white Uni-ball Signo pen and a teal Crayola color pencil.


Next, I cut both papers into quarters, as seen below....


Choose a panel from each sketch to be part of your bird. Then glue them down on a full sheet of paper. 

I'll let the pictures speak for themselves. You can see how the bird develops....


Here is the finished bird......


This time two birds!


Here they are completed.


Last one...it's actually the first bird I did, but forgot to take the progression photo! Sorry...


Give it a try.....let's see what you come up with.....:)